{article.name}

Beautify Your Lawn with Walkways and Fencing
If you're looking for a way to enhance your front yard, consider adding walkways or fencing. They not only improve the aesthetic appeal of your property, but also allow you to create functional pathways to and from your garden, shed or front door.
Head to your local True Value hardware store for everything you need to change your lawn from boring to beautiful. Then follow the steps below to get started on these home improvement projects.
Lay a Flagstone Walkway
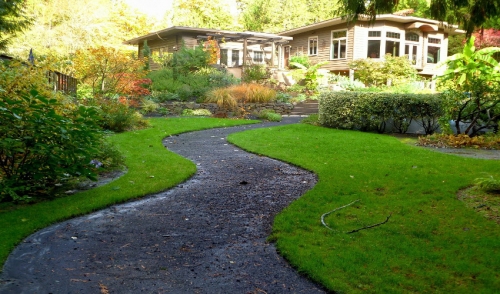
Flagstone walkways are a simple way to beautify your lawn and garden. They're durable, require little maintenance and blend well with almost any type of outdoor décor. Here's how to build a walkway.
Step 1. Choose Style
Making curves in the layout of your walk and using flagstones with unique shapes creates a less formal impression, while a straight walk with squared corners and more traditionally shaped stones are more formal.
Step 2. Measure Perimeter
For either a straight walkway or a curved pathway, measure the perimeter's dimensions with a tape measure and string. With a hammer, drive a wooden stake into the ground at each corner. Attach the string to the stakes at the base. On each stake, measure and mark a point 1/4'' above the ground. This will be the height of the finished path. Tie string between the stakes at the 1/4'' mark, using a line level to keep it straight. Make a rough layout with flagstones along the staked-out pathway to make sure your design works.
Step 3. Install Edging
Edging gives the walkway a finished look and provides structure. The edging can be bricks, lumber, or preformed plastic or metal. Edging can be added before or after laying the stones.
Step 4. Prepare Foundation
Dig out the sod between the string boundaries using a shovel. If you choose to use the sod later, set it aside in a cool place and keep it watered. Dig up the soil so you have a depth of 2 1/2'' from the base of the foundation to your string. Tamp soil flat when you're done. Re-check the slope and spread about 1 1/2'' of sand evenly over the area. Level the sand with a 2''x4'', smoothing the surface with the edge. Tamp the sand over the entire foundation surface, taking care to maintain the slope on all surfaces.
Step 5. Lay Stones
Place the flagstones on top of the compacted sand. Adjust the height of each flagstone as necessary by adding or removing sand. Lay a straight 2''x4'' across the surface of the stones to check for any unevenness. Gaps between the larger pieces can be filled in with smaller ones.
Step 6. Cut And Shape Stones
If cutting is required to fit the curve of the walkway, draw a cut line on the stone with a pencil. Tap the chisel along the cut line with a small sledgehammer, making a series of cuts. Prop the flagstone so the cut line hangs over the edge of a piece of scrap wood used as a chisel and position it in the middle of the cut line. Strike the chisel with the sledgehammer, breaking the flagstone along the groove. To shape the stone, place it on top of the stones it will fit against and chip away the edges using the chisel blade.
Step 7. Finishing Touches
To fill in gaps between the stones, sprinkle a layer of sand over the entire walkway and sweep over it with a broom. Dampen the pathway with a light misting from the garden hose. Finish the edges of the walkway with strips of sod or mulch tucked in and around the flagstones.
Install a Picket Fence
A picket fence adds a touch of charm to your home. If you have children or pets, it can also protect them from leaving your property. Here's how to do it:
Step 1. Outline Fence
Measure the area to be fenced and drive stakes into the ground at the corners. Stretch a string between the stakes and check it with the level. Mark locations for posts with spray paint about 7 ½ feet apart.
Step 2. Dig Postholes
The size of the holes will depend on the height and weight of your fence. Generally, make each hole as deep as 1/3 the length of the post. Dig holes using a power auger. Add about 3'' of gravel in the bottom of each hole to allow for proper drainage. Tamp the gravel down with the posts.
Safety Alert!
• Always wear safety goggles and work gloves when using power tools.
Step 3. Place Posts
Place posts in each hole and make sure they are straight. Pour in fast-drying concrete or soil and gravel, tamping frequently as you add material to the hole. Make each post as sturdy as possible. Stretch strings between the posts to make sure they are in line with one another. After the posts are in place, spread soil around the base of the posts to create a more finished appearance.
Helpful Tip:
• Good post placement is essential for building a high-quality fence. If the posts are out of alignment, the entire fence will be crooked.
Step 4. Install Stringers
Long pieces of wood known as stringers get attached to picket fences horizontally near the top and bottom of the fence and act to support the pickets. Measure the space between posts and cut two 2"x4"s to that length. Fit the stringers between the posts and attach them using 2'' galvanized nails and a nail gun.
Step 5. Attach Pickets
Count the number of pickets you'll need and cut them to size. Cut out your own design or purchase pickets with a precut design. Use the nail gun to set the pickets in position and secure them with screws. Use a block of wood to make the spacing even.
Safety Alert!
• Keep the pickets fairly close together so that children and pets cannot fit their legs or heads between them.
Step 6. Apply Cover
Once all the pickets have been attached, apply paint or stain with a paintbrush to protect your new fence.
Congratulations! You've made your lawn and garden more attractive by adding functional, attractive features such as walkways and fences. Be sure to head to your local True Value hardware store for continued lawn care tips.
Comments